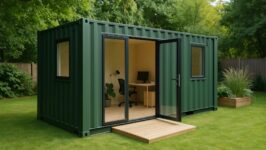
Build a Backyard Office or Studio with a Shipping Container
Your house is packed, your kitchen table is now your office, and your creative space? Nonexistent. That’s when the idea hits you—what if you had your own backyard office or studio? Not a shed or a tent, but something real. A shipping container might not sound cozy at first, but with a little vision, it can become the perfect workspace right outside your door.
If you’re working from home, painting, recording music, or just need a quiet place to think, a container studio gives you room to breathe. It’s affordable, durable, and totally customizable. And best of all—you can build it without tearing up your house.
Here are the steps to make dreams come true!
Why Use a Shipping Container for a Backyard Office or Studio?
You could build an addition or buy one of those pre-fab sheds, but a shipping container hits the sweet spot between cost, durability, and cool factor. These things are made to handle rough travel and harsh weather, so they’re tough by design. 
Plus, the basic shape makes it easy to work with—just a steel box ready to be transformed. You can insulate it, cut in windows, and finish the inside like any room in your house. It’s also fast. You’re not waiting months for framing and roofing—you’re starting with a solid structure.
And let’s be real: it looks awesome in your backyard. If you want a minimalist workspace or a quirky creative zone, a container gives you a blank canvas that won’t fall apart after one storm. It’s functional, unique, and just a little bit rebellious—in the best way.
STEP 1: Choosing the Right Container
Before you start designing your dream workspace, you need the right box. A 20-foot container is usually perfect for a solo office or compact studio. It fits in most backyards without overwhelming the space.
If you want room to stretch or host clients, a 40-foot model gives you double the length. High cube containers are another great option—they’re a foot taller and make the space feel more open. You’ll also need to choose between new (“one trip”) or used. New ones look cleaner and are less likely to have rust or dents. Used ones cost less but may need some TLC.
Always check the container for holes, floor damage, and strong odors. Pro tip: buy from a local, reputable dealer so you can inspect it in person or get detailed photos. Remember, this container is your foundation—make sure it’s solid from the start.
STEP 2: Planning Your Layout and Design
This is the fun part—turning an empty steel box into something that works for your life. Start by thinking about how you’ll use the space. Is this a quiet office? A messy art studio? A music room with gear?
That helps you decide where to place windows, doors, and outlets. There are prefab container office designs to get ideas from. Most people cut in a full glass door and a couple of windows to let in light and avoid the “metal cave” vibe. You’ll also want to plan for insulation (trust me, metal gets hot and cold fast), flooring, lighting, and maybe even a small HVAC unit. Sketch out your layout or use free design tools online.
Think about storage too—built-in shelves or wall-mounted desks can save space. It’s like solving a puzzle where every square foot counts. A little planning now will make your container feel like a real part of your home, not just a box out back.
STEP 3: Site Preparation and Placement
You’ve got your container picked out—now where’s it going to live? First, check with your local city or county about zoning laws and permits. Some areas treat containers like sheds, others have stricter rules.
Once that’s squared away, you’ll need a level foundation. Gravel pads work well, but concrete blocks or piers offer extra stability. You don’t want your container settling unevenly over time. Make sure the spot is accessible for delivery—those things arrive on big trucks, and sometimes you’ll need a crane to set it in place.
Think about sun exposure, privacy, and noise too. Do you want morning light pouring into your studio? Or a shaded retreat for deep focus? Orient the container to match your style. Once it’s down, it’s not easy to move—so take your time choosing the perfect spot. A few hours planning now saves a ton of regret later.
STEP 4: Container Modifications and Buildout
Now the real transformation begins. Start with insulation—metal boxes aren’t known for cozy vibes. Spray foam works great, sealing out moisture and helping control temperature. Then you can frame the inside with wood or metal studs, run your electrical wiring, and get the walls ready for finishing.
Drywall gives it a homey feel, but some people go with plywood or shiplap for a rustic or modern look. Install flooring that fits your vibe: vinyl planks, laminate, or even reclaimed wood. Cut in doors and windows if you haven’t already—this is your space, so make it shine. You can also upgrade the exterior with paint, wood siding, or planters to soften the industrial look.
Every modification brings it closer to your dream. Don’t rush it—this is the part where the container turns from “just a box” into something that reflects you. That’s where the magic happens.
STEP 5: Making It Comfortable and Inspiring
This isn’t just a workspace—it’s your personal zone of focus and creativity, so make it feel that way. Add a small heating and cooling unit to keep it comfortable year-round. Natural light boosts your mood, so position your desk by a window if you can. 
Use rugs and acoustic panels to soften echoey sounds, especially if you’ll be on calls or recording. Don’t forget about lighting—soft, warm LEDs work wonders, and a well-placed lamp can turn the space from “industrial” to “inviting.”
Bring in some plants, wall art, or anything that makes it yours. Wi-Fi is a must, so plan to run a cable or use a range extender from the house. This is your zone—somewhere to shut the door, breathe deep, and actually get stuff done. With the right touches, a container can feel more inspiring than any room in your house.
Turning a shipping container into a backyard office or studio gives you space to focus, create, and escape the daily noise—without a major construction project. It’s affordable, durable, and completely customizable to fit your style and needs. With a bit of planning and creativity, that steel box becomes your personal retreat just steps from home. A container studio is a smart, modern solution that turns your backyard into something truly useful.