Knockdown Texture VS. Orange Peel – A Comparison
For many homeowners, wall and ceiling textures are not much more than an afterthought and often get overlooked when deciding on how the future home will look.
However, in many homes, different surface textures add character to the environment and make other home decor elements come together to create a unique interior design.
The reason for this may be that many people are not aware of the vast range of textures available for walls and ceilings.
Most are familiar with only a few basic and most popular finishes.
Still, there are plenty of different options that can help you express your creativity and make the home feel like your own.
Two techniques you should definitely consider are knockdown texture and orange peel.
Below, I’ll take a closer look at these two techniques and compare knockdown texture vs orange peel to see how they stack up against each other.
| Knockdown Texture | Orange Peel | |
| Appearance | Has a subtle, flattened texture with a slightly bumpy look | Has a fine, spattered texture that resembles the skin of an orange |
| Application | Requires a hopper gun and special trowel to create the knockdown effect | Can be applied with a regular spray gun or roller |
| Versatility | Can be used on walls and ceilings and is suitable for a variety of styles | Typically used on walls only and may not be suitable for some styles |
| Durability | Offers better durability and resistance to wear and tear than Orange Peel | May be prone to cracking and peeling over time |
| Repairability | Easy to repair by applying joint compound or texture mud and re-texturing the affected area | May be difficult to repair and may require reapplication over a larger area |
What is Knockdown Texture?

The knockdown texture has been around since the 90s when it replaced more classic popcorn and orange peel finishes.
It implies a finish with a rustic and unique pattern similar to stucco.
The mottled, naturalistic texture of the knockdown finish quickly became popular due to its dimensional visual impact, good sound insulation, and ability to hide surface imperfections.
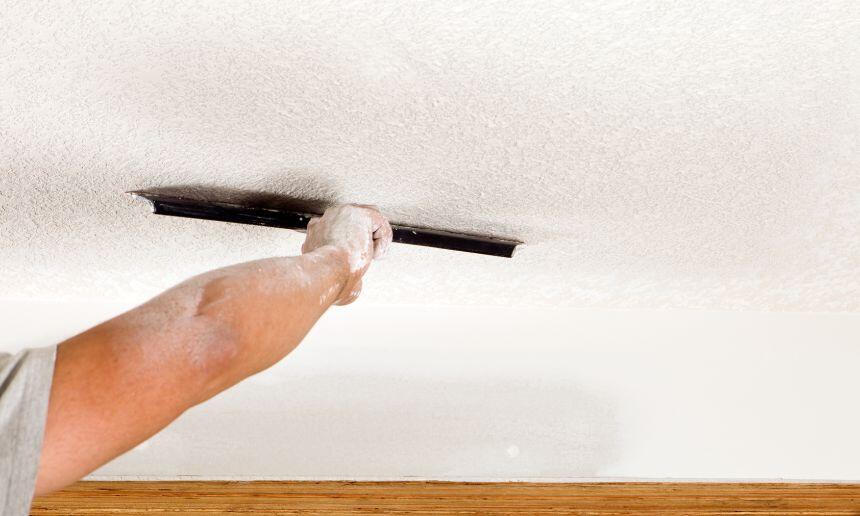
The texture is applied and then “knocked down” using a drywall knife to drag over the drywall compound and flatten the surface.
It’s mainly recognizable by the consistent round-droplet pattern formed on the wall or ceiling surface.
The droplets themselves can be of various dimensions, ranging from the smaller ones, the size of a dime, to larger ones the size of a silver dollar.
As the knockdown texture is medium dense, the original surface is usually visible between the droplets.
Depending on the technique used, there are three major types of knockdown texture.
Splatter
Splatter is the most common type of knockdown texture.
It features an intricate droplet pattern, inspired by lace veils, and has a classic appearance similar to the one of Spanish lace stucco.
The pattern itself is a bit more rounded than with other knockdown techniques.
The splatter knockdown finish is applied by using a hopper gun to spray (splatter) joint compound powder mixed with water or pre-mixed wet drywall mud onto the surface.
The peaks formed by spraying the mud are then flattened with a knockdown knife which should be at least 18 inches wide.
The result is a low-profile raised texture covering around 40% of the wall surface, while the rest keeps the flat appearance.
The application technique is rather easy and simple. However, it can get messy, as the mud splatter can sometimes be difficult to control.
This is especially the case when applying it to the ceiling.
Stomp
Stomp finish features the most prominent texture of all three knockdown techniques, meaning that the elevation off the surface is higher than what is achieved with the other two.
The exact texture appearance will depend on the type of brush used to knock down or stomp drywall compound and the dents it will create.
The application is done in three steps. First, a pre-coat of drywall compound is applied to the wall or ceiling with a paint roller.
Then, a stiff-bristled crow-foot brush is “stomped’ into the mud, hence the name of this knockdown texture.
Finally, using a wide knockdown knife, the mud is flattened to create a finger-like texture covering around two-thirds of the wall or ceiling surface.
Because of all these necessary stages, applying stomp knockdown texture takes about twice as long as is the case with the splatter technique.
Troweling
The third commonly used knockdown technique is troweling, named after the mud or skip trowel used for its application.
This technique will help you achieve a flatter, more subtle, and somewhat more elegant look than with the other two knockdown texture types.
The end result is a larger texture with round shapes created by the skip trowel, resembling splashes of paint.
The first step in achieving this effect is applying drywall compound onto the surface with a curved-blade drywall trowel which should be no less than 18 inches wide.
Once applied, the mudded area is then skimmed again using the cleaned trowel. The point of using a curved trowel is that it allows mud to skip across the wall or ceiling.
By doing so, it creates a sparse texture consisting of round globules covering about 50 percent of the surface.
As you apply the mud with a trowel instead of a paint roller or by spraying it, troweling is more time-consuming than splatter or stomp techniques.
What is Orange Peel Texture?
Orange peel texture as a technique of applying a finish over the wall or ceiling surface reached its peak popularity during the 80s and early 90s.
After being out of style for a while, it’s now making a comeback and reemerging as a trendy element in interior design, although mainly in hotels, and commercial buildings.
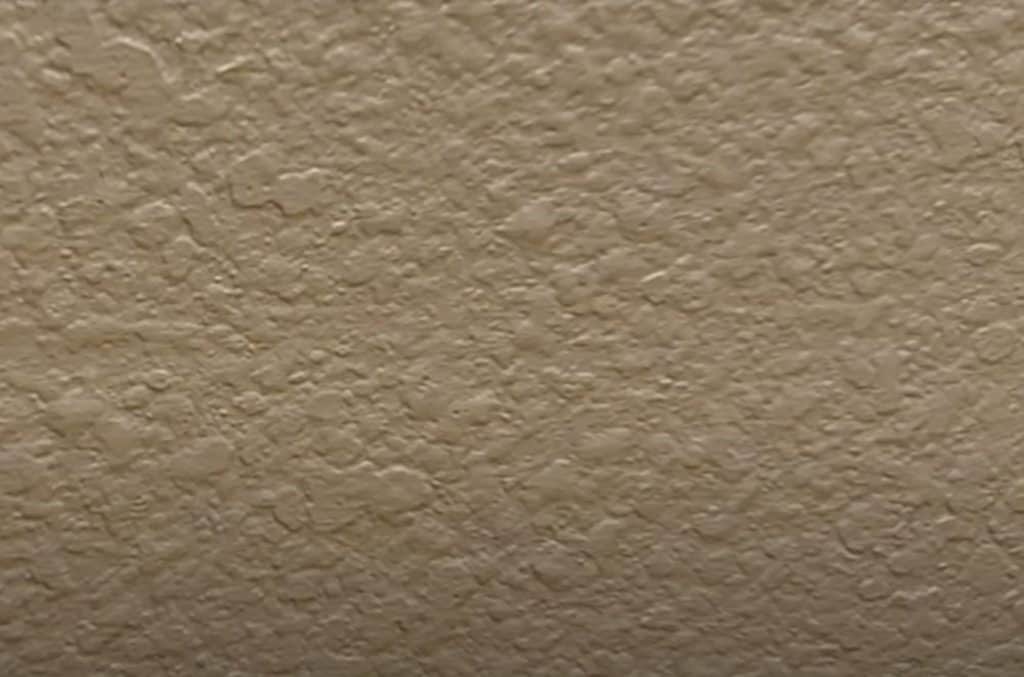
Of course, the orange peel texture’s name is a pretty good indicator of what it actually looks like, it closely resembles the peel of an orange.
The surface after applying this technique is dimpled like orange skin, but it feels more smooth to touch.
As it’s not as raised as some other wall textures, orange peel provides a more uniform look and feel compared to other techniques.
However, it still does a pretty good job of hiding surface imperfections and is very durable, simple to apply, and easy to clean.
How to Apply Orange Peel Texture
Applying orange peel texture is rather similar to the splatter knockdown technique. The drywall mud is sprayed onto a surface using a hopper gun and an air compressor.
The air and the mud mixed to a buttery density are combined and sprayed through the nozzle, splattering across the wall in thousands of small droplets.
As these mud droplets land on the surface, they slowly merge and create a consistent but thin layer of drywall compound all across the wall or ceiling.
Once the texture is dried up, it takes on the characteristic appearance of an orange peel.
Even though the process is rather straightforward and relatively quick, it can be challenging to maintain texture consistency across the entire surface.
While the technique itself is similar to spray painting the walls, you can’t use a roller to smooth out the uneven areas as the texture will need to dry during application.
Knockdown Texture vs Orange Peel – What are the Differences?
| Knockdown Texture | Orange Peel |
 |  |
If you compare knockdown texture vs orange peel, you’ll notice that there are some similarities between the two.
They’re created using somewhat similar techniques and provide a finish that may seem relatively similar at a first glance.
Each of them can liven up the space and add visual interest to plain walls and ceilings. Plus, they both work great as a means to hide imperfections on the wall or ceiling surface.
Another similarity is the basic material used for both textures, as they each involved drywall joint compound or mud, although of different density and consistency.
However, even though knockdown texture and orange peel both offer an enhanced aesthetic appeal compared to flat surfaces, they are two different techniques with plenty of subtle but still notable distinctions.
Below is an overview of the most significant differences between the two.
Application
I’ve already covered the application techniques for both textures and established that they’re fairly similar.
This is especially true for the orange peel and the splatter type of knockdown texture.
For starters, they both require previously prepared surfaces and both involve spraying mud across the surface. Still, this is where similarities stop.
When spraying the mud to achieve orange peel texture, the air pressure should be higher and the tip of the nozzle smaller.
This allows droplets coming out of the nozzle to be smaller and form a uniform texture instead of larger individual globules of knockdown texture.
Of course, the main difference is that knockdown texture requires further steps following the spraying.
Depending on the technique, this may involve a knockdown knife, skip trowel, or a stiff-bristled crow-foot brush.
This means that compared to orange peel, application of the knockdown texture will require more work, time, and tools.
Cleaning
Both knockdown texture and orange peel create an uneven and relatively rough surface.
This means that you can expect dust and mold accumulation, especially if the surface is not regularly maintained.
However, as both these textures protrude from the wall, cleaning can be a bit of a hassle, and definitely more challenging than with flat surfaces.
Regular maintenance using a feather duster, cloth, or vacuum cleaner is necessary to keep these surfaces clean.
Due to its uniform structure and slightly smoother surface, orange peel is somewhat easier to clean than knockdown texture.
Durability
Even though they are done with more or less the same material, knockdown texture and orange peel technique don’t offer the same durability.
The reason for this mainly lies in the difference in the level each texture is raised from the wall and their different uniformity and consistency.
With textured areas much larger than it’s the case with orange peel, the knockdown texture is much more prone to breaking or flaking.
Flattening the drywall mixture once it’s applied to the wall or ceiling further contributes to the fragility of knockdown droplets.
On the other hand, the orange peel will likely last longer even though it covers a larger surface area of the wall.
As the droplets of the orange peel texture are so tiny, it makes them stick to the wall better and are less prone to damage. Simply said, there’s less material to be damaged.
Repair
Occasionally, for whatever reason, you may need to repair a textured wall or ceiling surface.
When comparing knockdown texture vs orange peel in terms of ease of repair, the advantage is clearly on the side of the latter.
As the only possible difference in the application is the nozzle size, replicating the process and repairing the damaged area shouldn’t be too hard.
All you have to do is reapply the drywall mud the same way you did during the original application.
Once dried, the repaired area should look the same as the rest of the surface. In the case of knockdown texture, things can get a bit more tricky.
Recreating the same knockdown texture during the repair is almost impossible, even if you’re using the same tools and drywall compound.
This is especially the case if the original pattern was particularly intricate.
Customization
In terms of customization of the surface, orange peel offers much less than the knockdown texture.
The orange peel texture is confined to only one application technique – spraying, so there’s not much choice when it comes to its appearance.
The only thing you can do to make it look a bit different is to use a different size of the spray gun nozzle to make the droplets slightly larger or smaller or change the mud density and consistency.
Still, in most cases, orange peel is done using the smallest nozzle.
With knockdown texture, the wider range of techniques and tools used provides more customization options.
I’ve already mentioned that there are three different types of application – splat, stomp, and troweling.
Using each of them will deliver a different result, so you’ll have a better chance to customize the surface according to your personal preference.
Conclusion
Textured wall and ceiling surfaces are making a big comeback.
More and more, they’re replacing flat surfaces, especially among homeowners who look to make their house look a bit homier.
The contribution of textured surfaces to the overall feel of the living space certainly shouldn’t be underestimated.
Besides a more interesting appearance, they also improve the acoustics of the room and create extra warmth and depth to the living space.
If you decide to go with a textured surface in your home, your choice will likely come down to the knockdown or orange peel technique.
Which one will be your choice will mostly depend on the effort you’re willing to invest and your personal aesthetic preference.
The knockdown texture offers more options for customization but will require more work and time.
The orange peel is fairly simple and quick to apply, easy to clean, and more durable.